Crochethook's Blog

Would you like to see my stitches?

Together in Electric Dreams April 22, 2012

Filed under: Completed projects,Free pattern,Yarn Stash — crochethook @ 10:16 am
Tags: , , , , ,

This week I had a commission from Monkey.  (I say commission, what I mean is a barefaced, non-negotiable demand but I like to be diplomatic.)  We have been watching more daytime TV than is good for our sanity recently and one of the adverts that keeps appearing again and again is for EDF Energy.  They have a new mascot which looks like it was the misbegotten chimera of a poo and a breast.  Yet, despite this, it is also rather sweet and appealing, especially when it’s dancing in a birdbath to the Hawaii Five-0 theme tune. Monkey was a little smitten and could see no reason why I shouldn’t crochet him up his own version at once.

I googled him to have a good look and a ponder only to find that Princess Delirium had beaten me to it with a completed pattern.  Huzzah for the internet!  Turns out his name is Zingy and he is supposed to be a flame.  I had trouble finding wool that was anywhere near the right shade but my LYS had a discontinued, slightly bobbly baby yarn which was close enough.

So behold:

Mr Zingy as Monkey is rather formally calling him.

His eyes are a bit wonky as I didn’t have any safety eyes to hand but Monkey doesn’t seem to mind.

Love is blind

All in all a successful project.  Even better from my point of view was the additional yarn which I accidentally paid for while I was shopping.  6 balls of Sirdar’s Raffaella

Pretty!

will hopefully become this jumper very shortly.


Aqueduct Scarf Pattern September 25, 2011

Filed under: Completed projects,Free pattern,Yarn Stash — crochethook @ 9:49 am
Tags: , ,

As promised, I have written up the Aqueduct Scarf pattern for anyone who would like a copy. And then corrected the pattern on 30/10/11 when I noticed I had missed out a couple of instructions. 

I used 3 balls of Artesano Merino DK which I’ve had knocking about for a while and a 4.5mm hook. This gave me a scarf that was 12cm wide by 164 cm long.  Gauge isn’t important so I think this would work in whatever wool you have to hand and with whatever hook you feel works for you.  The pattern is straight forward enough that, once you have done a few repeats, you can do it on auto-pilot.  I have added a fringe to mine in a contrasting colour as I have a hat in mind to go with it and not enough of the yellow wool to do both.

Close-up

As a side note, this was the first time I had ever used a bamboo hook.  When I first started to crochet I had some small plastic hooks which I really didn’t like and I put this down to the weight.  I was far happier with the heavier metal hooks I had also bought. For some reason, I was convinced that I would have the same problem with bamboo.  I only finally got Pony bamboo hook when I had the vague idea of crocheting on a flight.  As it turns out, I LOVE the hook and so I didn’t risk trying to take it in my hand luggage in case I had to dump it at security.  I am seriously tempted to add to my hook collection with a few more of these lovely, lovely things.

Anyhow, here’s the pattern.  I *think* it’s right but please do let me know if you spot any typos.

1) Chain 28, treble in 4th chain from the hook (3 chain counts as first treble in every row) and in each stitch across. (25 treble) Turn.

2) Chain 3, treble in next stitch and in each stich across.

3) Chain 5 (counts as first treble plus 2 chain), skip next 2 stitches, treble into next stitch,* chain 2, skip next 2 stitches, treble into next stitch** Repeat *-** to the end of the row.

4) Chain 3, *2 treble into next chain space, treble into next treble.** Repeat *-** to the end of the row.

5) Chain 4 (counts as first treble and 1 chain), skip one stitch, treble in next stitch, *chain 1, skip one stitch, treble in next stitch**  Repeat *-** to the end of the row.

6) Chain 3, *treble into chain space, treble into next treble.**  Repeat *-** to the end of the row.

7) Repeat rows 3-6 until scarf is as long as you desire.  Add fringe if required.


By special request June 26, 2011

Filed under: Free pattern,Quick Projects — crochethook @ 7:16 pm
Tags: , , ,

I got a request through Ravelry this morning from someone wanting to turn the granny star into a blanket square.  I hadn’t really thought about it before but, as it was a lazy Sunday morning, I was happy to give it a go.  It does work but I think the squares may have to be interspersed with more solid squares before you could make a blanket using them.

One benefit of this is that I realised there was a typo in the final round of the original granny star pattern.  I have amended this but I feel bad about anyone who came a cropper on it in the past.  Sorry!  To make amends I thought I would post this here and on Ravelry for anyone who fancies it.

Here is the pattern I have come up with to turn a star into a sqaure:

Round 1:  Chain 6, slip stitch into first chain to create a loop.

Round 2: Chain 3 (counts as treble throught out), 2 trebles into the ring, chain 3.  *3 trebles into the ring, chain 3**.  Repeat *-** 4 times.  (5 groups of 3 trebles made.) Join with a slip stitich in first 3 chain of the round.

Round 3: Slip stitch into the next 3 chain space from the previous round.  Chain 3, 2 trebles into the chain space from the previous round, chain 3, 3 trebles into the same chain space, chain 1.  *3 trebles into the next 3 chain space from the previous round, chain 3, 3 trebles into the same chain space, chain 1.**  Repeat *-** 4 times.  Join with a slip stitch in first 3 chain of the round.  (10 groups of 3 trebles made.)

Round 4: Slip stitch into first 3 chain space from the previous round.  Chain 1, (1 double crochet, 1 half-treble, 1 treble, 1 double treble, 1 treble, 1 half-treble, 1 double crochet) in same chain space, chain 1, *slip stich in next 1 chain space, chain 1,  (1 double crochet, 1 half-treble, 1 treble, 1 double treble, 1 treble, 1 half-treble, 1 double crochet) in next chain space from previous round, chain 1.** Repeat from *-** 4 times.  Slip stitch into final  1 chain space, chain 1, slip stitch into first dc to join.  Fasten off.

Round 5:  Attach yarn to any double treble crochet from the previous round, chain 1 and dc into same stitch, 19 chain, 1 dc into next double treble crochet, chain 9, 1 dc into next double treble crochet, chain 18, 1 dc into next double treble crochet, chain 9, 1 dc into next double treble crochet, chain 19.  Slip stitch into first dc.

Round 6: Chain 2, treble crochet in same stitch, 10 treble into the chain, chain 3, 9 treble into chain, 1 treble into dc from previous round, 9 treble into chain, 1 treble into dc from previous round, chain 3, 19 treble into chain, 1 treble into chain from previous round, chain 3, 9 treble into chain, 1 treble into dc from previous round, 10 treble into chain, chain 3, 10 treble into chain, slip stitch into first treble.

Round 7: Chain 1 and dc in same stitch.  Dc round into each treble and 3 dcs in each 3 chain corner space.  Fasten off.

Monkey has been photobombing again.


Threads March 13, 2011

Filed under: Work in Progress,Yarn Stash — crochethook @ 8:10 pm
Tags: , ,

I have come to a conclusion about myself: I am a masochist.  I had an urge recently to investigate the mysteries of Irish Crochet. I don’t know if this was some desire to get in touch with the manifold woes of my ancestors or just because I am easily distracted. Anyway, one look at the vintage patterns on the web made me realise that I had no hope of being to just dip into the art.  At the very least, I was going to have to have a crack at crocheting in thread with a tiny hook first rather than in wool with a whacking great one.

I had some number 10 crochet cotton knocking about from an ill-advised foray into tatting. (I have always fancied being either a Roman or a Victorian.  Reading masses of Victorian novels while I was studying had convinced me that tatting was a craft I should try and cultivate to get into the 19th Century mind-set.  I was, however, completely rubbish at it.  If you want to see how it should be done, check out Occasional Crafter’s blog which never fails to engender jealousy and admiration in me.  I suppose I should just be grateful that the Roman fantasies didn’t get the upper-hand or I could have been blogging about being sacked for wearing a toga to work.)

I also had the tiny hooks as I had bought every size I could find when I was a rookie crocheter but never used them. I got started by trying out an uncomplicated motif from The Harmony Guides: Crochet Stitch Motifs using the thread and a 2mm hook. I plumped for the Waterwheel motif which consisted solely of trebles and chains and it came out surprisingly well.

The Waterwheel, now used by Mr Grasshead as a little mat to sit on.

Emboldened by my success, I raided Ravelry for patterns.  There were a lot of doilies and, although very pretty , they didn’t strike me as particularly useful objects to start churning out.  Then I found this wonderful tablecloth pattern. (NB: if you fancy a go at this yourself, there should be an errata for row 5.  It says * ch 3, sc over end of next loop, 1 sc in each of the next 3 sc, sc over beginning of next loop, ch 3, 3 dc in center dc of next 3 dc group, ch 4, dc in center st of next loop, ch 1, 3 dc in center dc of next 3 dc group, repeat from * whereas it should be “ch 4, dc in centre st of the next loop, ch 4“.)

My first motif took me a week which was a bit disheartening.  This was partly due to the misprint but mostly because the thread and hook still felt so fiddly to work with.  I am picking up speed now I have made 5 squares, however, and can average one motif in about 3 hours.  It feels like starting to learn to crochet all over again as I have to look at what I am doing rather than glancing down every now and again but the results seem to be worth it.  I can’t believe my ham-fists have produced something so delicate.


I was very impressed with myself when it came out right.

4 motifs joined together produces a square 5″ by 5″ so I am unlikely to reach tablecloth size any time soon. Maybe a nice tray-cloth instead.  That feels very Victorian. And the Irish Crochet?  At this rate I’ll be ready to make a start sometime around 2013. Check back then for an update.

1 and a half week's work.


Granny Star Decoration November 30, 2010

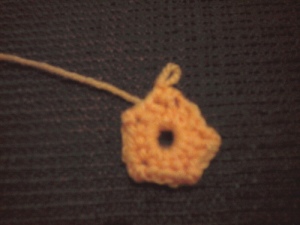
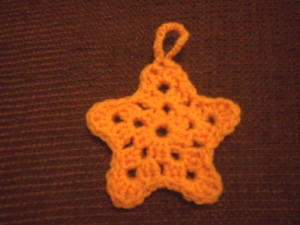
This tree decoration grew out of the snowflake decoration I blogged the other day.  Again it is a modified granny square.  This time it uses a granny pentagon as a base with a modified final round. I have included photos of each round as a visual guide.  This too take minutes to complete.

Round 1:  Chain 6, slip stitch into first chain to create a loop.

Round 2: Chain 3 (counts as treble throught out), 2 trebles into the ring, chain 3.  *3 trebles into the ring, chain 3**.  Repeat *-** 4 times.  (5 groups of 3 trebles made.) Join with a slip stitich in first 3 chain of the round.

Round 2 complete

Round 3: Slip stitch into the next 3 chain space from the previous round.  Chain 3, 2 trebles into the chain space from the previous round, chain 3, 3 trebles into the same chain space, chain 1.  *3 trebles into the next 3 chain space from the previous round, chain 3, 3 trebles into the same chain space, chain 1.**  Repeat *-** 4 times.  Join with a slip stitch in first 3 chain of the round.  (10 groups of 3 trebles made.)

Round 3 complete

Round 4: Slip stitch into first 3 chain space from the previous round.  Chain 1, (1 double crochet, 1 half-treble, 1 treble, 1 double treble, 1 treble, 1 half-treble, 1 double crochet) in same chain space, chain 1, *slip stich in next 1 chain space, chain 1,  (1 double crochet, 1 half-treble, 1 treble, 1 double treble, 1 treble, 1 half-treble, 1 double crochet) in next chain space from previous round, chain 1.** Repeat from *-** 4 times.  Slip stitch into final  1 chain space, chain 1, slip stitch into first dc to join.

Round 4 complete and hanging loop added

Finishing:  If you want to add a hanging loop, slip stitch into first double treble of round 4, chain 25, slip stitch into same double treble and fasten off.


Gingerbread Man Decoration November 14, 2010

Filed under: Completed projects,Free pattern — crochethook @ 11:08 am
Tags: ,

I have spent this week knocking out Christmas decorations to be sold at a charity event in December.  I have been raiding books, magazines and websites for inspiration but there were quite a large number of patterns that I just wasn’t happy with.  One of the items that gave me the most problems was a Gingerbread Man. None of the patterns I found came out right when I tried them so, in desperation, I made up my own.   I hope to get the chance to blog some of the other patterns I have written before Christmas but I thought I would start with my Gingerbread Man as I am really rather pleased with him.

Gingerbread Man

I used DK weight wool and 3.5mm hook but I think it would work as well with adjustments for the yarn you have on hand.

Round 1: Using brown yarn make magic loop, 6 dc into ring.  Join with slip-stich

Round 2: Chain 1, 2 dc in crochet in each stitch round.

Round 3; Chain 1, 1 dc in first stitch, 2dc in next stitch to the end of the round.  Head done.  Do not fasten off

Body

Row 1:  Chain 1, dc in in next 3 stitches.  Turn. (3 stitches)

Row 2: Chain 1, 2 dc in first stitch, dc in next stitch, 2 dc in final stitich.  Turn. (5 stitches)

Row 3: Chain 1, dc in first stitch,  2 dc in second stitch, 1 dc in middle stitch, 2 dc in next stitch, dc in final  stitch.  Turn.  (7 stitches)

Row 4-11: 1 dc in every stitch and turn.  Do not fasten off.

Legs:

Row 12: 1 dc in first 3 stitiches. Turn.

Row 13- 18: 1 dc in each stitch and turn. (3 stitches)

Row 19: 1 dc in each stitch and fasten off.

Attach yarn at other side of the body and repeat rows 12-19 to create the second leg.

Arms:

Row 20: Attach yarn at Row 2 of the main body.  1 dc in next 3 stitches/rows and turn.

Row 21-25: I dc in each stitch and turn. (3 stitches)

Row 26: 1 dc3tog and fasten off.

Repeat rows 20-26 for other arm.

Finishing:

Attach white yarn and work one dc around the outline of the piece.  Attach beads or sequins for facial features and buttons or embroider details.  Attach a small piece of yarn or ribbon at the top for hanging.  You may wish to starch the piece to give it some rigidity.